Monday, March 18, 2013

First Around the World

I admired all those Scrappy Around the World quilts seen on various blogs and pininterest and as I had a selection of pretty pinks and purples I decided to make a little girls quilt. This is my first one and I used Bonnie Hunter's instructions on her  Quiltville blog to make this 48"x48" quilt top or 'flimsey'. http://quiltville.blogspot.ca/2005/06/scrappy-trips-around-world.html
It has been a learning adventure as I have such a challenge letting go of the process and trusting the outcome. With the result that the outcome is less than it could be.  However I'm sure a little girl will enjoy it, warts and all. The bottom row is pinned in place.

 
Isn't quilting wonderful? We learn so much - about our styles, our capacity to take or give criticism, ability and willingness to develop new skills, to organize (or not), get together with like minded people (in big or small groups or in blogland), make lovely pieced blankets, wall hangings or decorations for ourselves or others and so much more.


Sunday, March 17, 2013

Fabric Purchases

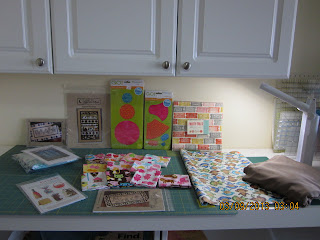
Yesterday, I attended the 6th fabric sale of a deceased quilter. She did a lot of traditional quilting, taught quilting and left behind rooms of material, patterns and books. Her husband and his new wife have sorted it and offered it for sale. I wish I knew more about her and them but don't. This time there were boxes of her projects for sale (6)  and I dallied over them for quite awhile. All of them were hand stitched and she may have done 1-4 blocks or most of them. There were several basket quilts, a dresden which I bought, a couple of moderns, and many traditional, a box of 600 triangles-red and navy,plus, plus, plus. As for the other fabric, it was in stapled bags in boxes. The larger pieces were stacked on two bookcases, 1 piece per bag. While the remaining was several fat 1/4's or portions of per bag-an enormous task of organizing which isn't over yet.These boxes were on tables in 2 rooms of a home built in the 40's in Victoria - Cook Street/Dallas Road area, 1 block from the ocean. The urge was to take it all, just back the moving van up to the door and load it all. Resisting that I collected the following to add to my stash starting with the hand pieced dresden kit I purchased. 


The book was free and was the third one I have picked up there. And the moda layer cake was $10. After reading several comments on fabric shrinkage, everything but the moda was washed and dried after the photo shoot. Next I will fold each piece and add it to my organized stash. How nice to be able to say that. What will happen to your quilting supplies when you die? Do you care?

Friday, March 15, 2013

Book Giveaway

Patti, from My Current Obsessions blog is giving a Carrie Nelson book away on Monday.  Get on over there and enter to win. http://quiltingisstillmypassion.blogspot.ca/
Patti has more prizes coming up so you might want to follow her blog. Good Luck.

All my Pretties Coming Together

I feel like Golum in the Lord of the Rings trilogy as I fondle and sort my fabric.
Peggy likes the new arrangement.
This is my main cutting area. The containers on the bottom hold all my scraps.


Feels good to finally be making some progress in my lovely sewing room. How and where to put things have been big questions and although I have found a system that seems to work for right now, I expect changes will be made. I am not by nature an organized person-more of a pile person. I see the merits in organization, I'm just not disciplined enough. However, I'm glad I have taken the time to clean my room up - love being able to see my fabric. You can see some of my faithful companions - all rescues: Peggy is a long hair domestic, Kink- a short hair very gentle soul and on the floor, Tonto our almost 14 year old reprobate. Back to my room. I still have lots of fabric to bring in and organize but most of my quilting fabric is here. I used to sew for myself and my daughter and am hoping that if I can see the fabric and patterns, I will be inspired to start sewing clothes again as well as purses, baby clothing, receiving blankets, etc.

Monday, March 11, 2013

The Victoria Sewing Show. I wait for this show every year and although it seemed smaller this year, I managed to leave lots of money behind. I took my camera but it was crowded I didn't take many. Here's a few- a photo of this great screen:

 as well as these photos:


Wish my camera showed the detail of the work involved. All I could say was "oh, my" over and over again. Looking at these photos I may have had the wrong setting on my camera. Sorry for that.
This is the photo of a kit I bought - once made it will be my first 'Window Pane' wall hanging.
and a pattern for this:
and another pattern for two like this: Halloween and a Snowman one by same artist.
Below is a pile of my stuff. Missing is 'String Fling' by Bonnie Hunter which is my bedtime reading material right now. There is something very appealing about her books - as well as daunting about tackling one of her patterns with all those little pieces! But I am going to and soon. So intriquing. Love the animal fat quarter bundle by Robert Kaufman. Plan on making baby and toddler items this year - always so many around and they are not critical.

It's all so yummy! The fabric on the right in the first photo is some lovely slinky from Gala Fabrics for a long top for me - planning to use a pattern from Material Girls. Well, I'm hoping to do some sewing today - am working on a few things - still organizing my space which might be done by Christmas the rate I'm going; am almost finished the top for my first 'scrappy around the world' (also my first 'around the world'), have started a scrappy bargello for a little boy and have many more I wish to make. lol. Talk to you soon.

Wednesday, November 2, 2011

TrueLove for TrueCut

I have trouble cutting straight lines sometimes - hate to admit it but I do. I also have some issues with my neck, shoulders and wrist. I saw the TrueCut Rotary system demonstrated last Christmas season and it looked great but I couldn't justify buying it when I already had cutters. Time passed and I found it on sale recently and now I am blogging about it. As you can see, I bought the 60mm ergonomic cutter with the 6 1/2 inch ruler. The ruler has a "guide" along the edge and the cutter has a channel which fits into it 'locking' it in place and it is a dream to use for anyone you know starting out or having health issues. It is advisable to buy a package of True Grips to place on the back of the ruler. Once done, it does not slip and you have lots left for other rulers. The rotary cutter takes any 60mm blade. I am currently cutting out my first spider block quilt and am loving this cutter. Note that when cutting to the left side of the cutter because of the guide you will be running the cutter towards you which we are taught is a no, no but has worked well for me (only because the cutter is locked in). Hope your week is going well. It is getting colder here on the coast of Vancouver Island though yesterday was a beautiful sunny fall day.

Monday, October 31, 2011

Lil Twister

Have you tried theTwister Tool? I used the small one and two Holly Jolly Riley Blake charm packs (22- 5" charms in each pack) to make this table topper and enough border fabric for a 3" border as well as the binding. Was a fun project and the best part is my family likes it. The instructions come with the tool but here is the idea.
 1. Lay out 5"x5" squares in any pattern you wish. I used 42 charms and the layout was  7 across and 6 down. Try to have lots of contrast to show the effect well.
2. Sew charms in row using a 1/4" seam and sew the rows together after 'butting the seams together' and pinning carefully.
3. Cut 3" strips from the border material in this case another Rylie Blake fabric and sew to each side using a 1/4" seam as before.
4. Now comes the fun part. Take the tool and line up the horizontal and vertical lines at each junction starting the first one where the left top and side border meet the charm squares. Very carefully cut around the tool. I found using a small rotary cutter worked well. Work across the first row and keep each piece in order. You can sew them together as you go. Once the first row has been cut, drop down to the second row at the left and repeat the process. Continue untill all rows have been cut apart and resewn. Then join the rows together and reveal the design.
5. Your top is done UNLESS you want to use the 2" squares which are left over after each cut, which I decided to do. I used my GO Cutter to even up the squares and sewed them together and attached them to the sides, top and bottom. You may want to trim them down, attach to 2 sides only, save them for another project or discard them (don't do that - send them to me!).
I enjoyed making this but it does waste fabric and your project while interesting, does shrink quite a bit so you decide.

For another example and a visual step-by-step visit Michele at  Michelle's Quilts and Stuff. We both blogged about the twister on the same day and she sent me her link which I really appreciated.
Have a great week and Happy Hallowe'en!